
How to bake a normal map and how it helps to create highly performant quality 3D assets
Table of Contents
What is a normal map and why do I need it?
A normal map is a type of texture map used in computer graphics to simulate surface detail on 3D models. It works by encoding information about the direction of each normal on the original high-res model's surface, which helps to simulate surface detail on a lower resolution version of the same 3D model without the need for actual geometry.
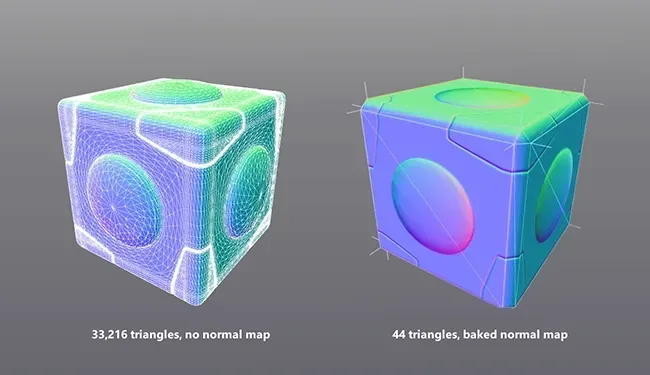
Normal maps are often needed for retaining 3D model’s surface details without the need for additional geometric data which would have a negative impact on the performance of many real-time applications such as video games, web-based 3D applications etc.

Normal Map vs Bump Map: Normal maps encode surface normals to simulate surface detail, while bump maps encode height information to create the illusion of depth and surface irregularities.
High/low resolution mesh/geometry: A high-resolution mesh contains a large number of polygons, capturing intricate details, while a low-resolution mesh has fewer polygons, representing a simplified version of the object with less detail.
UV Atlas/Layout: set or collection of UV coordinates that define how texture images are mapped onto the surface of a 3D model, enabling 3D artists to apply or bake textures maps. Compared to to other UV techniques such as UV tiling, UV atlases focus on unwrapping the entire surface of a model into a single set of UV coordinates (usually 0-1 coordinates).
Mesh Normal: Mesh normals, or "normals," are vectors associated with the vertices, edges, or faces of a 3D mesh in computer graphics. They indicate the direction perpendicular to the surface of each element of the mesh. Normals are crucial for rendering as they determine how light interacts with the surface, affecting shading and visual appearance.
Vertex Normal vs Face Normal: Vertex normals are vectors associated with each vertex of a 3D mesh, while face normals are vectors associated with each face or polygon of the mesh.
Tangent vs Object space: Tangent space normal maps encode surface details relative to the local tangent space of a 3D model, while object space normal maps encode details in relation to the global coordinate system of the model. Tangent space normal maps are a lot more popular for real-time graphics applications as the encoding is relative and thus suited much better for animated or moving objects in (3D) space.
Baking Cage: A baking cage is a simplified 3D mesh used during the baking process to define the space around a high-resolution model, ensuring accurate transfer of surface detail onto a low-resolution model.
Smoothing Groups: Smoothing groups are groups of polygons in a 3D mesh that share the same smoothing settings, influencing how lighting is calculated across adjacent faces to create smoother or more angular transitions between them.
Hard/Soft Shading: Hard normals create sharp edges between adjacent polygons in a 3D model, while soft normals create smooth transitions between them, affecting how light interacts with the surface during rendering.
[expert] Tangents, bitangents: Tangents are vectors perpendicular to the surface of a 3D model, lying in the plane defined by the surface normal and texture coordinates. Bitangents, also known as binormals, are vectors perpendicular to both the surface normal and the tangent, completing an orthogonal basis known as the tangent space.
[expert] tangent frames: Tangent frames, also known as tangent spaces, are coordinate systems used in 3D graphics to define the orientation of surface details such as normals, tangents, and bitangents relative to a point on a 3D model's surface.
[expert] MikkTSpace: MikkT Space is a popular tangent space used in computer graphics, particularly for real-time rendering. It is designed to improve the accuracy of lighting calculations by transforming normals from tangent space to a more uniform space.
▶ Read more: RapidPipeline Documentation - Baking
▶ Read more: How to create cages with Blender
▶ Read more: 3D optimization and how to use it in 3 simple steps
Create 3D digital twins for CGI & XR, faster than ever.
Turn your raw 3D or CAD into realistic digital twins.
How to bake a normal map
Steps to bake normal map fully automatically during 3D data optimization with RapidPipeline.
- Upload/import high-res data
- Select a preset (check in the preset editor that normal map baking is enabled)
- Inspect & download results
Steps on how to bake normal map manually:
- Prepare your 3D models: Create both, high-res and low-res model
- Prepare UVs: Make sure the low-res model has proper UVs without overlaps, set-up as an Atlas (1-by1 UV space)
- Prepare low-res smoothing groups: It is recommended, when manually baking normal maps, to have all the UV borders hard-shaded, please refer to your software of choice to perform this operation, often this can be automated via scripting (maya script example)
- Create a baking cage (advanced): Most modern baking software will automate this step (RapidPipeline automatically generates baking cages), but if you have to do this step manually, make sure you are duplicating your low-res mesh with exactly the same UVs and normals, then select all vertices and increase the size of the normal (“ballooning”) to the point where they are fully covering the high-res model. How to create cages with Blender.
- Set-up your texture baking software: This could be a DCC tool such as Blender, 3Ds Max etc. or a specialized baking tool such as Adobe Substance, XNormal, etc. (see below how Rapidpipeline automates the whole process)
- Bake your normal map: once your baking software is configured, you can go on and bake the normal map. The baker will perform ray-casting to project the high-res geometric detail onto the low-resolution model using the UV Atlas generated before
- Check the results: Make sure the generated normal map works correctly and captures all the surface detail from the input model. As this process can have lots of culprits, we recommend this detailed wiki if you have any problems your results.

Create 3D digital twins for CGI & XR, faster than ever.
Turn your raw 3D or CAD into realistic digital twins.
Meet the Author

Julian
Head of 3D Solutions & Co-Founder
Julian-Alexander Neagu is a real-time 3D graphics enthusiast with 10+ years of industry experience. He is co-founder of DGG and works with the company since 2018 as Head of 3D Solutions. Julian started his 3D journey working on indie games before switching to XR. After being part of multiple award winning productions, such as German AR music video: Tunnel AR, the underlying 3D graphics technology sparked an interest in him. Today Julian guides the development of several automation efforts to help making 3D real-time content more accessible to end-users and industry clients alike.